Wednesday, February 24, 2010

Windows Media Center Remote for Android


My plugin for Windows Media Center is required for the app to work properly! Find link below for instructions and download!

This is for my Windows Media Center app for android. The app allows you to control navigation in media center via flicks or D-pad, volume control, and transfering media from your phone to the media center for playback.

Features:
-Navigation of media center with up, down, right, left flicks and long press for context menu on selected items
-Media buttons (play/pause, back, next, stop, and record)
-Back and Green Media center buttons
-Ability to transfer photos, audio, and videos from the phone to media center for instant playback
-Change Media Center volume with the volume buttons on the phone

Requirements:
-Windows 7 (tested on x32 and x64 without issues) with Windows Media Center (I have no tested this with Vista)
-Android 1.5 or higher
-WIFI network

Setup:
1) Download my Media Center plugin from http://bit.ly/wmrplugin and install that on your media center computer that you wish to control.
2) Obtain the hostname or IP address of your media center. To get the IP address start a command prompt (Start > type in "cmd") then type "ipconfig" in that window. You are looking for the IPv4 Address which should be a series of numbers and dots (ex: 192.166.0.2)
2) Start Windows Media Center. The plugin only works while media center is running.
3) On your Android phone, start WIFI and connect to the network that your media center PC is on (From home screen: Menu > Settings > Wireless Controls > Wi-fi. Then select Wi-Fi settings and connect to your wifi network)
4) Start the app on your android phone, press menu button, and select Options.
4a) For "Media Server Name or IP" put in the address or hostname you obtained in step 2
4b) Enable "Connect on Startup" to automatically connect when the app is launched then go back
4c) Check media center computer for a "Allow network access" firewall warning window, hit "Allow Access" to allow the plugin to talk on the network if you see this window.
5) You will see a "connected" notification if the app succesfully connects to the media center, if not you will see an window pop up with the error. If the connection is unsuccesfull it can be for various reasons such as: firewall on media center computer that is blocking it, wrong IP address or hostname for your media center, Android WiFi not set up properly. You can keep hitting "Connect" in the menu to retry the connection.
6) Once you are connected you should immediatly be able to start flicking or pressing buttons and see results immediatly on the media center. If it stops responding, select "Connect" again from the menu to attempt to re-establish the connection from the phone to the media center computer.

Change Log:
v: 0.8
-Remove requirement that wi-fi be turned on and connected
v: 0.7.4
-Add option to specify if screen should stay awake
v: 0.7.3
-Prevent screen from going to sleep while app is open
v: 0.7.2
-Add record button (Requires an update to the Media Center plugin 1.2)
v: 0.7.1
-Add option for setting the background image
v: 0.7.0
-Fix disconnect error when navigating very fast
-Add volume changing using phone volume buttons
-Add D-Pad and trackball support for navigation
V: 0.6.2
-Automatically enable wifi connection if its off


Known Issues:
1) "No Route To Host" error. Re-start your wifi connection (toggle it on then off)
2) Connection can drop for many reasons. If your commands/flicks stop working then hit "Connect" again from the Menu.

NOTE: If you are having issues with either the app or the plugin please post email me or post a comment below and I will try and help you.
Wednesday, July 8, 2009

Dynamics CRM 4.0 Outlook client and SSL offload issues for IFD users

With my companies on-premise Dynamics server we use ISA for the SSL offloading and routing to the IFD server for external users. Another reason we do this is for the host header rewrite capabilities of ISA, since we named our Dynamics organization as the same as our company name (I'm sure many people do this). We didn't want to see https://companyname.companyname.com as the browser url, so we picked something more suitable like https://crm.companyname.com so that its easier for the end user to remember and just makes more sense.

The problem that this creates, is when configuring the CRM Outlook client to use https for the external server, the SSL offload is happening at ISA. So the Dynamics server doesn't see it as an SSL connection during discovery and reports back that the URL's to the Dynamics services are normal Http. This works fine if you also expose non SSL traffic to your IFD server, but in our case we don't and do a 302 response to https. You will get this error message when you open Outlook off the network if you are set up in a similar fashion:


Fortuntely we just need to modify a few registry keys where the server url is stored to fix this. Using Registry Editor (regedit.exe), browse to HKEY_CURRENT_USER\Software\Microsoft\MSCRMClient

The two keys you will need to modify and add the https to are WebAppUrl, ServerUrl, ExtranetServerUrl, and ExtranetDiscoveryUrl.

After making the registry changes, launch Outlook and everything should connect up just as expected.

Monday, June 1, 2009

Overriding and Filtering Multiple Record Lookup Form for Microsoft Dynamics CRM 4.0

Warning: This will require some javascript and html coding knowledge, and one of Dynamics javascript files must be modified for this to work. Make sure you make backups of any files before modifying them.

One of the big limitations in Dynamics, is the inability to do any type of filtering or custom columns for the multi lookup form. I had a request from our support team to pre-filter the lookup results for contacts on the email forms To, CC, and BCC fields to only show contacts that are linked to the account that the regarding case is linked too. Without this they have to either open up the account and select contacts to find them, or do an advanced find lookup, both of which are a massive time waist for them and also prone to possible errors since they would have to then remember those contacts and go searching for them in the multi lookup form on the email. And we have far too many contacts and accounts for them to be expected to remember them by name when they are doing the lookup on the existing lookup form.

Unfortunately there is no built in or supported method for doing this, but I believe there is some third party tools out there to make this somewhat possible (Stunnware has something that looked useful and very well done). I decided to go down the road of trying to hijack the lookup window from Dynamics and display my own form, so that I can provide some highly customized functionality for their needs instead of trying to make something else work in our special way.

I first opened up the new email form in IE8 and attached the built in debugger (F12) and started profiling into what actually happens when you click the lookup glass image for the To and other multi lookup fields.

The To, CC, and BCC fields call the LookupObjects() method in wwroot\_static\_controls\Lookup.js which will build a url for what form to use. Since this does this based on a property on the field itself, I decided to use this to open my form instead and not require special code to handle my forms results. Here is the section of the LookupObjects() method we will take advantage of:

url = prependOrgName("/_controls/lookup/lookup");
url += lookupStyle;
url += ".aspx";
url += "?class=" + lookupClass;
url += "&objecttypes=" + lookupTypes;
url += "&browse=" + lookupBrowse;

As you can see, the lookupStyle is the property on the field we can change from “multi” to our own value (“multiaz” in my case) and then place an appropriately named file “LookupMultiAz.aspx” in that same directory (/_controls/lookup/) and it won’t require a modification of this method to get our custom form, or of the result handling.

Unfortunately we can’t just get away with modifying the fields lookup style attribute to point to our new form. Dynamics makes a call to the BuildFeatures() method in that same Lookup.js file to determine the sizing of the lookup window it’s about to open, and it will alert and stop your window from opening if it does not know about your new lookup style. So with a simple modification to the switch statement in the method, we can add our lookup style.
WARNING: This is not supported and you are modifying this file at your own risk! Make a backup copy first!

function BuildFeatures(lookupStyle) {
var oFeatures = new Object();

switch (lookupStyle) {
case "multiaz":
oFeatures.height = "460px";
oFeatures.width = "650px";
break;
case "multi":
oFeatures.height = "460px";
oFeatures.width = "600px";
break;
case "single":
oFeatures.height = "488px";
oFeatures.width = "600px";
break;
case "subject":
oFeatures.height = "450px";
oFeatures.width = "500px";
break;
default:
alert(LOCID_LOOKUPSTYLE_NOT_SET + lookupStyle);
return null;
}

return oFeatures;
}

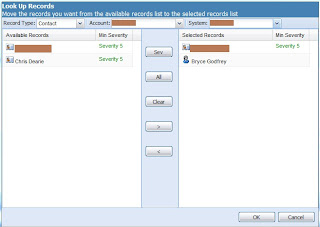
Next we need to make a new form/web page to replace the LookupMulti.aspx used by Dynamics. You must name this page Lookup[CustomStyle].aspx (replace [CustomStyle] with the name you chose in the previous steps, “multiaz” for me so “Lookupmultiaz.aspx”). In this page you will need to implement your own custom lookup and record selection to replace the Dynamics multi lookup form. Here is an example of the custom form that I designed for our support team based on their criteria:


To make your form work with Dynamics you need to pass back the records in the same format that Dynamics is expecting to get them in. Dynamics expects to get back the LookupItem object from LookupDialogs.js file (same location as Lookup.js), which you can re-use by adding a reference to it in your custom page. I chose to just copy the LookupItem() function to my form instead of referencing the file since I didn’t need anything else in there. As there is no real type safety in javascript, the object you return just needs to contain the correctly named properties.

function LookupItem() {
this.id = "";
this.name = "";
this.html = "";
this.type = "";
this.values = null;
this.keyValues = null;
this.category = null;
this.ambiguousRecordsXml = null;
}

The only properties that need to be filled out for each LookupItem is:
id = the record id (guid)
name = name of the record (John Doe)
html = html to display the record

type = type code for the record (contact = 2, system user = 8, account = 1, etc)

Then add each LookupItem to the items property on an object and return it by setting the value to window.returnValue when ready.

var lookupItems = { items: new Array() };
var item = new LookupItem();
item.id = ‘{479ECE53-099D-4fe5-92AE-AAA13659E7AC}’;
item.type = 2;
item.name = ‘John Doe’;
item.html = ‘<NOBR><IMG class=ms-crm-Lookup-Item alt="" src="/_imgs/ico_16_2.gif">John Doe</NOBR>’;
lookupItems.items.push(item);

window.returnValue = lookupItems;
window.close();

The other thing your form will need to handle is if the field already has values and the user opens your custom form, those values will be passed to your form by Dynamics using the dialogArguments property.

var args = this.dialogArguments;
for (var i = 0; i < args.items[i]; i++){
var recordHtml = args.items[i].innerHTML;
var recordId = args.items[i].getAttribute('oid');
var recordType = args.items[i].getAttribute('otypename');
//Do something with the record now
}

In your custom form you will need to query dynamics to retrieve records to present to the user, this can be done many ways and I wont get into that here. In my example I use a javascript library from Asenctium to interact with Dynamics that handles the SOAP mess, and the ExtJs framework for building my form and the interactions.

Happy coding!